Making of the Eyeball Mushroom
Get it here: https://printbabe.ca/products/eyeball-mushroom
Phase 1 - It started with a failure
The idea is a spooky mushroom which has eyeballs on it. You never know how naive your idea was until you actually did it. But that doesn’t mean the thinking beforehand was useless.
A few months ago, back when we were still in China, I designed a mushroom with eyes, but those eyes didn’t move. Recently, I’ve been obsessed with the satisfying sound of articulated joints of those 3d printed little charms, so I decided to upgrade the design and make the eyes rotatable.
The idea came easily, but making it work was another story. Given the nature of 3D printing, any object that floats in midair must be supported, otherwise, it simply can’t be printed. The eyeball, in this case, floats inside a hollow socket with no contact points. That means it can’t be printed in one go. And honestly, I didn’t want to print it all at once anyway - the eyeballs and the mushroom body are different colors, and printing them separately is better for both quality and efficiency.
I came up with a solution: to trap the eyeball inside the mushroom by using a bowl-shaped part that’s slightly larger than the eye. The bowl would hold the eyeball in place from the inside, and I’d glue it to the inner wall of the mushroom using super glue. To make that work, I even added cylindrical pegs to align the bowl with the inner socket.
Everything looked good on paper. It seemed reliable and doable. But when I started to print, problems showed up. First, the bowl was too slippery. It was hard enough to grab it with tweezers, let alone hold it and align the pegs correctly deep inside the mushroom. Second, the gaps between the eye and bowl, and between the bowl and mushroom, were underestimated. They didn’t fit, and worse - there was no room to squeeze in glue. Any glue I did use risked sticking everything together into a solid failure.

Phase 2 - Sparks of hope
Despite adjusting Blender’s parameters to suit 3D printing, it’s still quite difficult to precisely control detailed parts during the design process. And when it comes to certain tricky parts like adding fillets to the edges after a Boolean operation it can be a nightmare. So I switched to Shapr3D, and everything went much more smoothly. That said, Blender still has a clear advantage when it comes to complex shapes. In fact, combining Blender and Shapr3D can give me the best of both worlds.
This time, I changed my approach. Instead of letting the eyeball spin freely, I decided to use a rod inserted into a hole to create a wobbling motion. One end of the rod holds the eyeball, while the other end is a much smaller sphere with a notch. That notch allows it to squeeze into the hole with a bit of pressure and keeps the eyeball from falling out.


The rendered result was pretty nice, me and my wife loved it. But again, not until it comes to actually printing job will you be able to realize there are 100 hidden issues ahead waiting to be solved.


The eyeball was printed one-time. I used the auto-orient but it turned out pretty bad. Also, the small sphere at the other end of the rod was too big that I broke one of them when I was trying to force it into the hole. Meanwhile, the bottom of the upper part of the mushroom needs to be flattened. This print is pretty lousy, but it also shows a direction for improvement. At the same time, the broken eyeball ignited another idea. I will do it later.

This attempt was better. I changed the way the eyeballs were held. The yellow part was the supporting structure. I would be in hell if I do this in Blender. The only shortage I think Shapr3D could improve is when I want to make changes to the boolean objects, it would be a lot easier if the two objects are still there after the calculation is done so I can make changes afterward. Blender dose this better. However, if you keep both objects there without applying them, the computer will run much slower.
This time I printed the eyeballs in parts and assembled them together. I gave each part 0.3mm of clearance it turned out a bit loose. Next time I will make it 0.2mm.
I made this supporting structure in order to let the eyeballs rotate freely. However, due to the characteristic of FDM printing, the print layers is almost inevitable. The friction between print layers made the movement of eyeballs less smooth. I’m thinking of reduce the size of the eyeballs to increase the room between the eyeballs and the shell so that the rotation might get better.

And also, the printing quality is yet to be fixed. Maybe I need to use the variable layer height, or change the object’s orientation angle. Til next time.
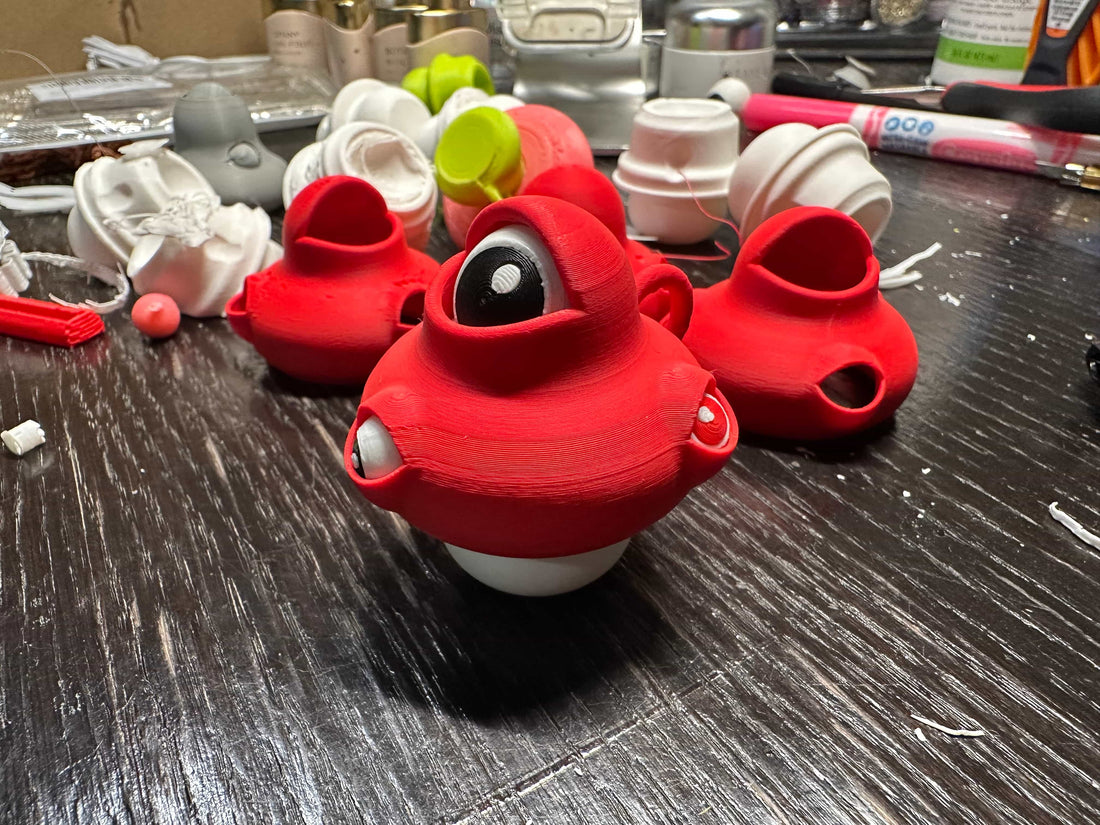
Phase 3 - Getting there
In order to keep the base in position, I added a brim to it. However the orientation of the base on printing bed was up straight, so the bottom of the brim is nasty. Also, some areas of the surface of the umbrella part were broken.


To fix those two issues, I tried to tilt the base at different angles for several times, set the Wall Loops to 3, and the Sparse infill density to 30%. I also printed the eyeballs separately, in order to make sure each part like the pupil and even the highlight was as clean as possible. However, the base was always giving me shitty results. No matter how I put it, there were always bumpy and rough surface.

Phase 4 - If you can't fix it, break it
I went for a jogging. Then I realized the reason why I couldn't get it printed right was because the shape of the base was too complicated. There were too many sides, when one side was taken care of, the rest sides would go wrong. So the best way was to separate them into small pieces.

Luckily it was fairly easy to do it in Shapr3D ( not an ad for them I promise ). When I realized that, everything became smooth.


There is another variantion with a different design of eyes. Also, there will be colour variations like the pink and bright green. And I will make some more mushrooms with different size and shape. But now it is 3:40am, I need to take a bath and get some good sleep. Stay in touch.